|
1.
2. |
Insert the cable ends through the V of each limb (figure
2). 
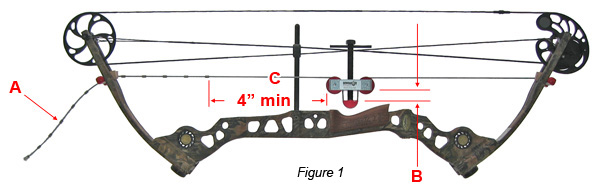
With
the jackscrew adjusted approximately 1" out (figure
1, B), pull the cable through the adjustable end
piece until there is no slack in the cable (figure
1, A).
Note:
If the bow is to be completely disassembled the
jackscrew will need to be started approximately 1/2" to
1" from its fully extended position. |
|
|
|
|
3.
4. |
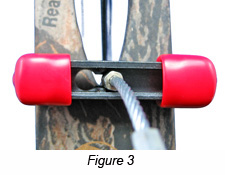 Slide
the cable stop (figure 1, A) completely over to the end
of the slot in the adjustable cable end, making sure
that it is seated properly past the indents (figure
3). Slide
the cable stop (figure 1, A) completely over to the end
of the slot in the adjustable cable end, making sure
that it is seated properly past the indents (figure
3).
Inspect the cable before each use. If there is any
sign of damage, such as a fray, the cable must be
replaced immediately. Never use the Bowmaster with
a damaged cable. Contact us directly for
replacement cables.
|
|
5. |
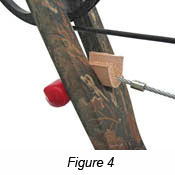 Fold
the leather pads supplied in half and place them in the
V of each limb between the Bowmaster cable and the limb
(figure 4). Fold
the leather pads supplied in half and place them in the
V of each limb between the Bowmaster cable and the limb
(figure 4).

CAUTION:
Position the Bowmaster at least 4" from the last stop
(Figure 1, C) before compressing the bow, otherwise the
stop may be pulled into the cable roller resulting in
damage to the cable roller and cable.
|
|
6. |
Turn
the jackscrew clockwise until the tension is adequately
removed from the sting and cable to perform the repair.
The 5/8" hex head on the end of the jackscrew permits
the use of a wrench or socket driver to make the job
even easier.
|
|
7. |
When
the repairs are complete, check the string and cables
for proper position, then turn the jackscrew counter
clockwise to restore tension to the string and cables.
|
|
! |
WARNING:
The limbs of a compound bow are under extreme tension.
Use caution while working on the bow. Keep the
face of the limbs away from you at all times. Eye
protection must be worn.
|
|
|
Note:
With proper maintenance, the Bowmaster will give years
of dependable service. The Jackscrew, thrust
washer and cable should be kept well oiled.
All-purpose or machine lubricating oil should be used.
Allow the oil to penetrate into the strands of the cable
before removing excess oil. |